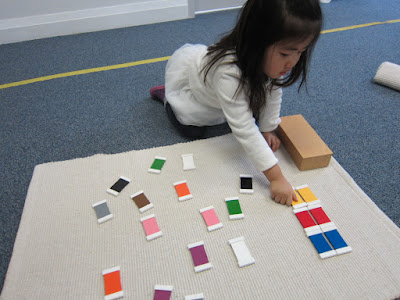
The activities in the Sensorial area of the classroom help the child sort out sense perceptions. Maria Montessori created many varied activities which highlight sight, touch, taste, smell and hearing. The Colour Tablets are one such activity which help develop the child's visual sense, the perception of colours. This includes differences in hues and intensities. This material is composed of three boxes.
Colour Box 1
Colour Box 1 contains the primary colours red, blue and yellow. There are 6 tablets in all.
 |
| Colour Box 1 |
The Montessori teacher invites the child to take the box to a mat. The teacher will remove all tiles from the box and place them in a random arrangement on the mat. The teacher will demonstrate the proper way of holding the tablets by the white wooden edges. The teacher will select one tablet and compare it to the others to find a match. This will be done for all tablets. The child is then invited to work with the material.
Colour Box 1 provides the child with the opportunity to pair items and identify colours. Once the child can match the tablets, language and games will be introduced. When the child is able to identify the colours, s/he will be introduced to Colour Box 2.
Colour Box 2
Colour Box 2 contains the primary and secondary colours along with brown, black, white, grey and pink. The box contains 22 colour tablets. |
| Colour Box 2 |
The presentation of Colour Box 2 follows the format of Colour Box 1. The teacher will remove the primary colours red, blue and yellow from the box and ask the child to pair them. If the child is able to pair them, the teacher will introduce the orange, purple and green tablets and invite the child to pair them. The final colours will be pink, white, brown, black and grey. After all the tablets have been paired, the child is invited to pair all of the tablets independently.
Colour Box 2 provides the child with the opportunity to pair items and identify colours. Once the child can match the tablets, language and games will be introduced. Games include finding objects in the room that match the colours of the tablets, and pairing tablets from across the room.
When the child is able to identify the colours, s/he will be introduced to Colour Box 3.
Colour Box 3
Colour Box 3 contains 7 shades of nine colours - red, blue, yellow, green, purple, orange, pink, brown and grey. There are 63 tablets in all. The box is divided into 9 separate compartments. Each compartment contains seven different intensities of one hue.
 |
| Colour Box 3 |
The presentation of Colour Box 3 follows the format of the previous two boxes. The teacher will select one colour and remove all 7 tablets of that hue. They are placed on the mat randomly. The teacher will begin with either the very darkest or the very lightest intensity of the hue. The teacher will then find the next darkest intensity of the hue by comparing the tablet with the rest. This will continue until all of the tablets have been placed in order. The child is then invited to choose a colour and grade the tablets.
The teacher will introduce the language - light, lighter, lightest and dark, darker, darkest - for each colour. The child is invited to continue grading other colours and will be introduced to games with this material.
In our classrooms, the children particularly enjoy working together to grade all of the tablets. This is one of the extensions of Colour Box 3.
Colour Box 3 enables the child to further refine their visual sense. The tablets in each section illustrate the subtle differences in one colour. Things can be blue, but also dark blue or light blue. The gradations of colour make a difference and are visible in the beautiful and colourful world around us.


